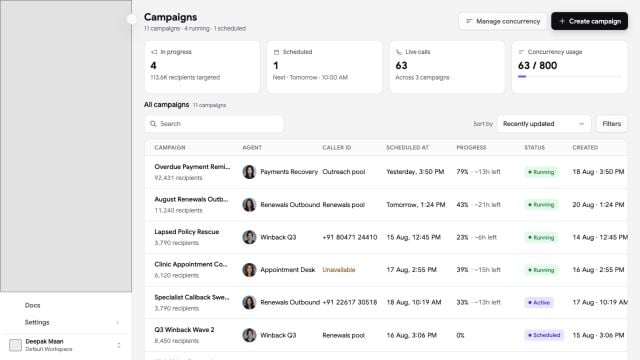
Campaigns use an agent, phone number, and contact groups to place outbound calls.
Persistence Campaigns dashboard with progress, schedules, caller IDs, and agent assignments

The Campaigns dashboard surfaces running and scheduled work, live calls, concurrency, progress, and status.

Create a campaign

1

Add basic details

Open Campaigns, select New campaign, and enter a campaign name. Select a phone number that has the intended outbound agent assigned.
2

Set concurrency

Choose how many calls the campaign can make concurrently. Use a level your workflow and connected services can support.
3

Choose audiences

Add at least one contact group. Include the DND groups that apply to the campaign.
4

Choose a schedule

Start immediately or choose a start date and time. For a scheduled window, set its start, end, and repeat days.
5

Review and launch

Review the reach analysis, then confirm the agent, phone number, included and excluded audiences, schedule, and concurrency before you start or schedule the campaign.

Control a campaign

The campaign list shows its current state. Depending on that state, you can start, pause, resume, or cancel the campaign. A campaign can move through states including draft, scheduled, running, paused, completed, cancelled, failed, or stopped. Open campaign details to review total contacts and call progress, including pending, queued, dialing, answered, and failed attempts. Edit a campaign only when its current state allows configuration changes. Pausing stops new campaign work while preserving progress; cancelling ends the campaign lifecycle.
Confirm consent, calling hours, DND groups, and other requirements that apply to your calls before launch.